Backend for Humans
by Adeoye Adefemi

Acknowledgement
I'll like the acknowledge the knowledge, expertise and efforts of authors, content creators and technical writers whose texts, videos, and articles helped in simplifying certain concepts in this resource.
Thank you!
Forward
At this stage of technological advancement, it is almost impossible to find a domain where software engineering is not used to drive productivity.
Backend for Humans is an incremental, self-paced and iterative learning journey designed for aspiring programmers and backend engineers, especially those with no previous programming experience or technical background.
Whether you’re a student, salesman, doctor, or simply curious about programming and backend development, this resource provides a clear, accessible path to understanding the world of backend engineering.
With no assumptions about prior knowledge, Backend for Humans aims to make complex topics digestible, empowering anyone to dive into the backend world with confidence.
— Adefemi Adeoye
Dedication
This work is dedicated to my sister who first clearly explained what a computer program is to me and to everyone who belief in practical approach to learning. From here, it's to stardom and beyond.
Learning requirements
To begin Backend for Humans, you need a laptop and access to internet. Additional requirements will be specified at the beginning of each module.
Mode of learning
The mode of learning is iterative, self-paced and assessment-based approach. Through assessments and continuous learning loops, Backend for Humans ensures that complex topics become accessible and engaging, empowering anyone—students, professionals, or the simply curious—to confidently explore backend development.
What you should know
Backend for Humans is so called because it assumes no prior knowledge or experience to technical fields. However, it is practically impossible that all my audience are from this background. Feel free to skip or skim over any module or concept you already know!
Happy hacking!
— Adefemi Adeoye
Module 1
In this module you will get a greater grasp of how computers work and what computer programs are. We will also briefly study computer programming languages. Let's get started!
Learning expectation
At the end of this module, you should be able to explain:
-
Concept of programming
-
What a computer program is
-
Programming languages
-
What a source file is
Learning Requirement
No additional requirement is needed for this module.
Introduction to Programming
To begin this module, see the video below.
What is computer programming?
Broadly, computer programming is telling a computer exactly what to do. Typically, the programmer need to understand the problem to be solved or the task at hand. Afterwords, the solution is implemented using special words, signs, and symbols, collective called code.
The end result is like giving the computer a recipe so it knows how to make something happen.
These special sets of words, signs and symbols constitute the term computer programming languages, a concept we will explore in detail.
A fitting analogy to understand code and programming language is liking code to an English Essay and liking Programming language to the English language
Introduction to programming languages
Programming language is a system of notation that uses special signs, keywords, symbols, and expressions to communicate with and by extension, instruct a computer.
Computer programs, as discussed in the previous part of this module, are sets of instructions passed to a computer to carry out a task.
To further understand programming languages, think about the natural languages like English, Russian, Spanish, and many more. The ability to speak English, Russian or Spanish help you communicate with someone in the United States, purchase something from a seller in Saint Petersburg, Russia, or study in Universitat de Barcelona, Spain as long as you can clearly communicate and understand them.
In the same manner, practical knowledge a programming language is a critical prerequisite for telling computers what to do and getting a desired response.
The computer is capable of doing a lot of things but only if you can clearly tell it what you need it to do.
Classification of programming languages
Before we delve into programming language classifications, we must firmly establish why we write programs and the several available ways to do it.
Programming Languages - Foundational Concept
As you may know or have heard, computers accept and process instructions in binary, which is essentially a large sequence of zero's and one's.

Humans are incapable of writing complex instructions in binary due to a high tendency of attention loss that lead to making multiple mistakes. This why computer programming languages are necessary.
Programming languages use an English-like construct which is easier to write and learn and consequently, easier to instruct the computer with. As of today, there are hundreds of programming languages, or a few thousand. Some of the popular ones are Python, C++, Java, C, and COBOL, to mention a few.
Source file
Generally, the raw form of instruction passed to a computer are contained in a special file called source file and the content of a source file is called source code. Some additional processes which we will discuss later on are required to turn the source code into a useful program. These processes collect source files and convert them into binary format (machine code) required by the computer.
Ideally, these special files or source files are essentially text files, with two parts;
a. A file name, which can be just about any character combination and
b. A file extension, a specific standard notation used to identify file types.
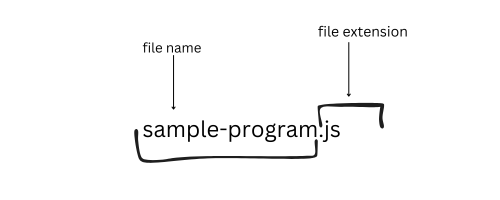
The source files of JavaScript, which is one of the programming languages we shall study, has its source files ending with .mjs .cjs or .js extension, other popular examples are .py for Python, .go for Golang, .rs for Rust, cpp for C++.
Classification of programming language
I mentioned the following concepts earlier, shall we do a quick recap before we proceed?
important
Computers understand binary, so we have to instruct them in binary.
Humans cannot efficiently codify instructions in binary, so we use a computer programming language. Remember? Ok good!
Eventually the instructions contained in source files will need to be processed by the computer. To do this, the computer uses special programs, such an interpreter or a compiler.
As the name implies, Interpreters translate the content of the source file to what the computer can understand, which is? ____ Yes! Binary is correct. This interpretation happens every time we want to perform a desired task. On the other hand, Compilers interpret the programs once and create something called an executable, this executable is read every time the task is required.
note
Interpreter translates every time the task is required to be completed Compiler translates once and create an executable file from the source file
Computer programming languages are classified based on the special programs the computer uses to decode the content of their source files.
Summarily, programming languages are classified as:
-
Interpreted languages, eg. JavaScript, Python, Ruby, Perl, etc.
-
Compiled languages, eg. Rust, C++, C, Zig, Go, etc.
There are other forms of classification such as imperative languages, Object oriented languages, functional languages, and maybe more but I will restrict our reach to only interpreted and compiled language.
And with that we have come to the end of this module. There is a review page and a few quizzes up next. Good luck!
Module review
-
Computers understand and operates 0's and 1's.
-
Humans cannnot efficiently codify instruction to be passed to a computer in 0's and 1's so they use computer programming language.
-
Computer programming languages use English-like constructs, special signs and symbols instead of 0's and 1's.
Module review
And now, a quiz:
Internet
The internet means different things to a lot of people, some people like to see it as being able to access a webpage at a high speed, "The internet is good!" they'll say. But is that all there is to it though?
Learning Expectation
In this module, we'll start by studying the concept of the internet in relation to computers. At the end of this module you should the able to:
-
Clearly explain the concept of the internet
-
Explain protocols and give examples
-
Explain what happens when we access a webpage
-
Make a network request
Learning Requirement
No additional requirement is needed for this module.
A closer look at the internet
To begin, we will start by looking at what the internet really is. Watch the video below and when you are ready to proceed, continue with the remaining part of the module.
The internet as we know is today began in the 1960s 1 as a research project aimed at ease of sharing information from one computer to another. The internet has since evolved to what we have today.
The internet is a probably simpler than you think, it is not a owned by someone or some organization. Remember we discussed computers in the first module of this book? For a refresher, computers are electronic devices, we see them commonly as phones, laptops, smartwatches, servers, and in many other forms. That said, these devices (phone, laptops, servers) are able to talk to each other and share information. The concept of computer communication is the internet. In other words, the internet is the networking of computers.
Computer networks
When we say networks, what exactly does it mean? Have you ever thought of it?
In the previous lesson, we talked about the internet as the concept of computer communication. In this section, we will discover that the internet itself is made up of numerous other networks. The following clip explains computer networks a little bit more.
Computer network are the linking of as many computers as you can imagine. Well, does it not bother you to think about how computers communicate with each other? How they identify themselves on a network? How they securely share information without someone eavesdropping, and many more?
We will talk about Protocols in the next section where you will learn how information sharing between computers are cordinated.
Protocols
Computer communication would be otherwise impossible without protocols. As a matter of fact, protocols are central to everything we do on the internet or other forms of computer networks. We'll discuss what they are and how they work.
important
Protocols are well defined set of rules that determines how computers communicates with each other.
Let's consider this example:
https://google.com is a website accessed everyday on the internet. Below is concise description of what goes on under the hood when you visit this webpage. (Included some technical terms but I'll explain them on the next page).
As you have might have noticed, a webpage would typically start with an http:// or https://.
-
The browser uses a DNS 1 resolver to translate the domain name into an IP2 address of the server.
-
The browser uses this IP address to connect to the server and request for a copy of the resource.
-
The server resolves this request and responds to the browser.
-
The browser receives the response and parses it as HTML3.
-
The browser renders the page.
When all these sequence happens, we typically say that "the page is loading".
As established in the previous parts of this module, the internet is a collection of resources and everything we access on the web (internet) is stored on a computer somewhere. The HTTP4 is a protocol that help us make request to access these resources.
DNS is protocol which stands for a Domain Name System
IP - internet protocol
Hypertext Markup Language
HTTP - Hypertext Transfer Protocol
Common Protocols
These are some of the protocols you interact with every day and their uses:
| Index | Protocol Abbreviation | Meaning | Uses |
|---|---|---|---|
| 1 | HTTP | Hypertext Transfer Protocol | Used for transferring web pages over the internet. |
| 2 | HTTPS | Hypertext Transfer Protocol Secure | Secure version of HTTP, used for secure communication over the internet. |
| 3 | FTP | File Transfer Protocol | Used for transferring files between client and server. |
| 4 | SMTP | Simple Mail Transfer Protocol | Used for sending emails. |
| 5 | POP3 | Post Office Protocol 3 | Used by email clients to retrieve emails from a server. |
| 6 | IMAP | Internet Message Access Protocol | Allows email clients to access emails on a server without downloading them. |
| 7 | DNS | Domain Name System | Translates domain names to IP addresses for locating resources on the internet. |
| 8 | DHCP | Dynamic Host Configuration Protocol | Automatically assigns IP addresses to devices on a network. |
| 9 | TCP/IP | Transmission Control Protocol / Internet Protocol | Basis of the internet, used for reliable data transmission between computers. |
Other protocols include gPPC, MQTT, AMQP.
One of the things we would do in later parts of this book is to write programs that use these protocols to make network request to a resource.
The next section explains what a resource is in detail and uses a sample program to make a network request.
Resources and network request
Resource
To best comprehend what a resource is, consider the following analogy,
Marks-5 is an hypothetical elite special forces unit in the Nigerian Army. The unit's duties include conducting the most deadly and crucial search and rescue missions; among other things, they have been known to recover abducted individuals and confiscate illicit weapons from the Mafia. All of their missions are top priority, and they know how to get the cargo back, whether it includes people, weapons, or drugs, the cargo is central to the mission.
In the same vein, everything on the internet is a resource, just like Marks-5's cargo --- a music on Spotify, the file you sent to your friend on WhatsAPP, your user profile on Facebook, an HTML page, a Google search result; everything on the internet is a resource.
Making a network request
In this section we would use JavaScript programming language to make a network request.
You can change users in const key = "users" to either recipe, todos,
comments, or post to fetch that specific resource.
To make this request, click on the play icon at the top right corner of the code snippet.
const key = "comments"; // change this line

fetch(`https://dummyjson.com/${key}?limit=2`)
  .then((res) => res.json())
  .then(console.log);
The above response may not seem typical but don't fret, the most important lesson here is that you made a request to a resource and you received a successful response. Congratulations! 🎉
Module review
-
The internet has its origins in the 1960s as a research project to enable computer communication.
-
The internet is a network of interconnected devices (phones, laptops, servers) allowing information sharing.
-
Protocols is are well defined set of rules that determines how computers communicate.
-
Common protocols we interact with everyday includes HTTP, HTTPS, FTP, SMTP.
-
A "resource" is any internet-accessible item, like a web page or user profile.
Module review
And now, a quiz:
Introduction to Operating Systems
In the previous modules, we established that computers, regardless of their form (laptop, desktop, mobile, etc.) or their use (gaming, video editing, software development, etc.), don't do anything magical.
To speak plainly, they're essentially a lump of plastic, metals, and electronic circuitry (hereafter called the hardware), powered by complex logic encoded as a form of a program.
We'd like to also established that, the software we write makes it possible to achieve almost any feat, as as much as we can think it, we probably can code it and make it work.
It will suffice to say that, these software we develop are managed on the target device by a house keeper present on that device. Although, this is not the case, on some devices. That said, I will like to establish that, this house keeper does all the heavy lifting of gluing our program unto the electronics hardware. It helps our computer understand what we want. This house keeper is also a kind of software, called the Operating System.
Operating Systems (OS) is a broad topic on its own. In this module, you will learn the basics that will aid assimilation of the remainder of the material.
Learning expectation
At the end of this module, you should the able to
-
Explain Operating system in your own words
-
Describe systems programming
-
Give examples of Operating systems
Learning Requirement
No additional requirement is needed for this module.
Meet the House keeper
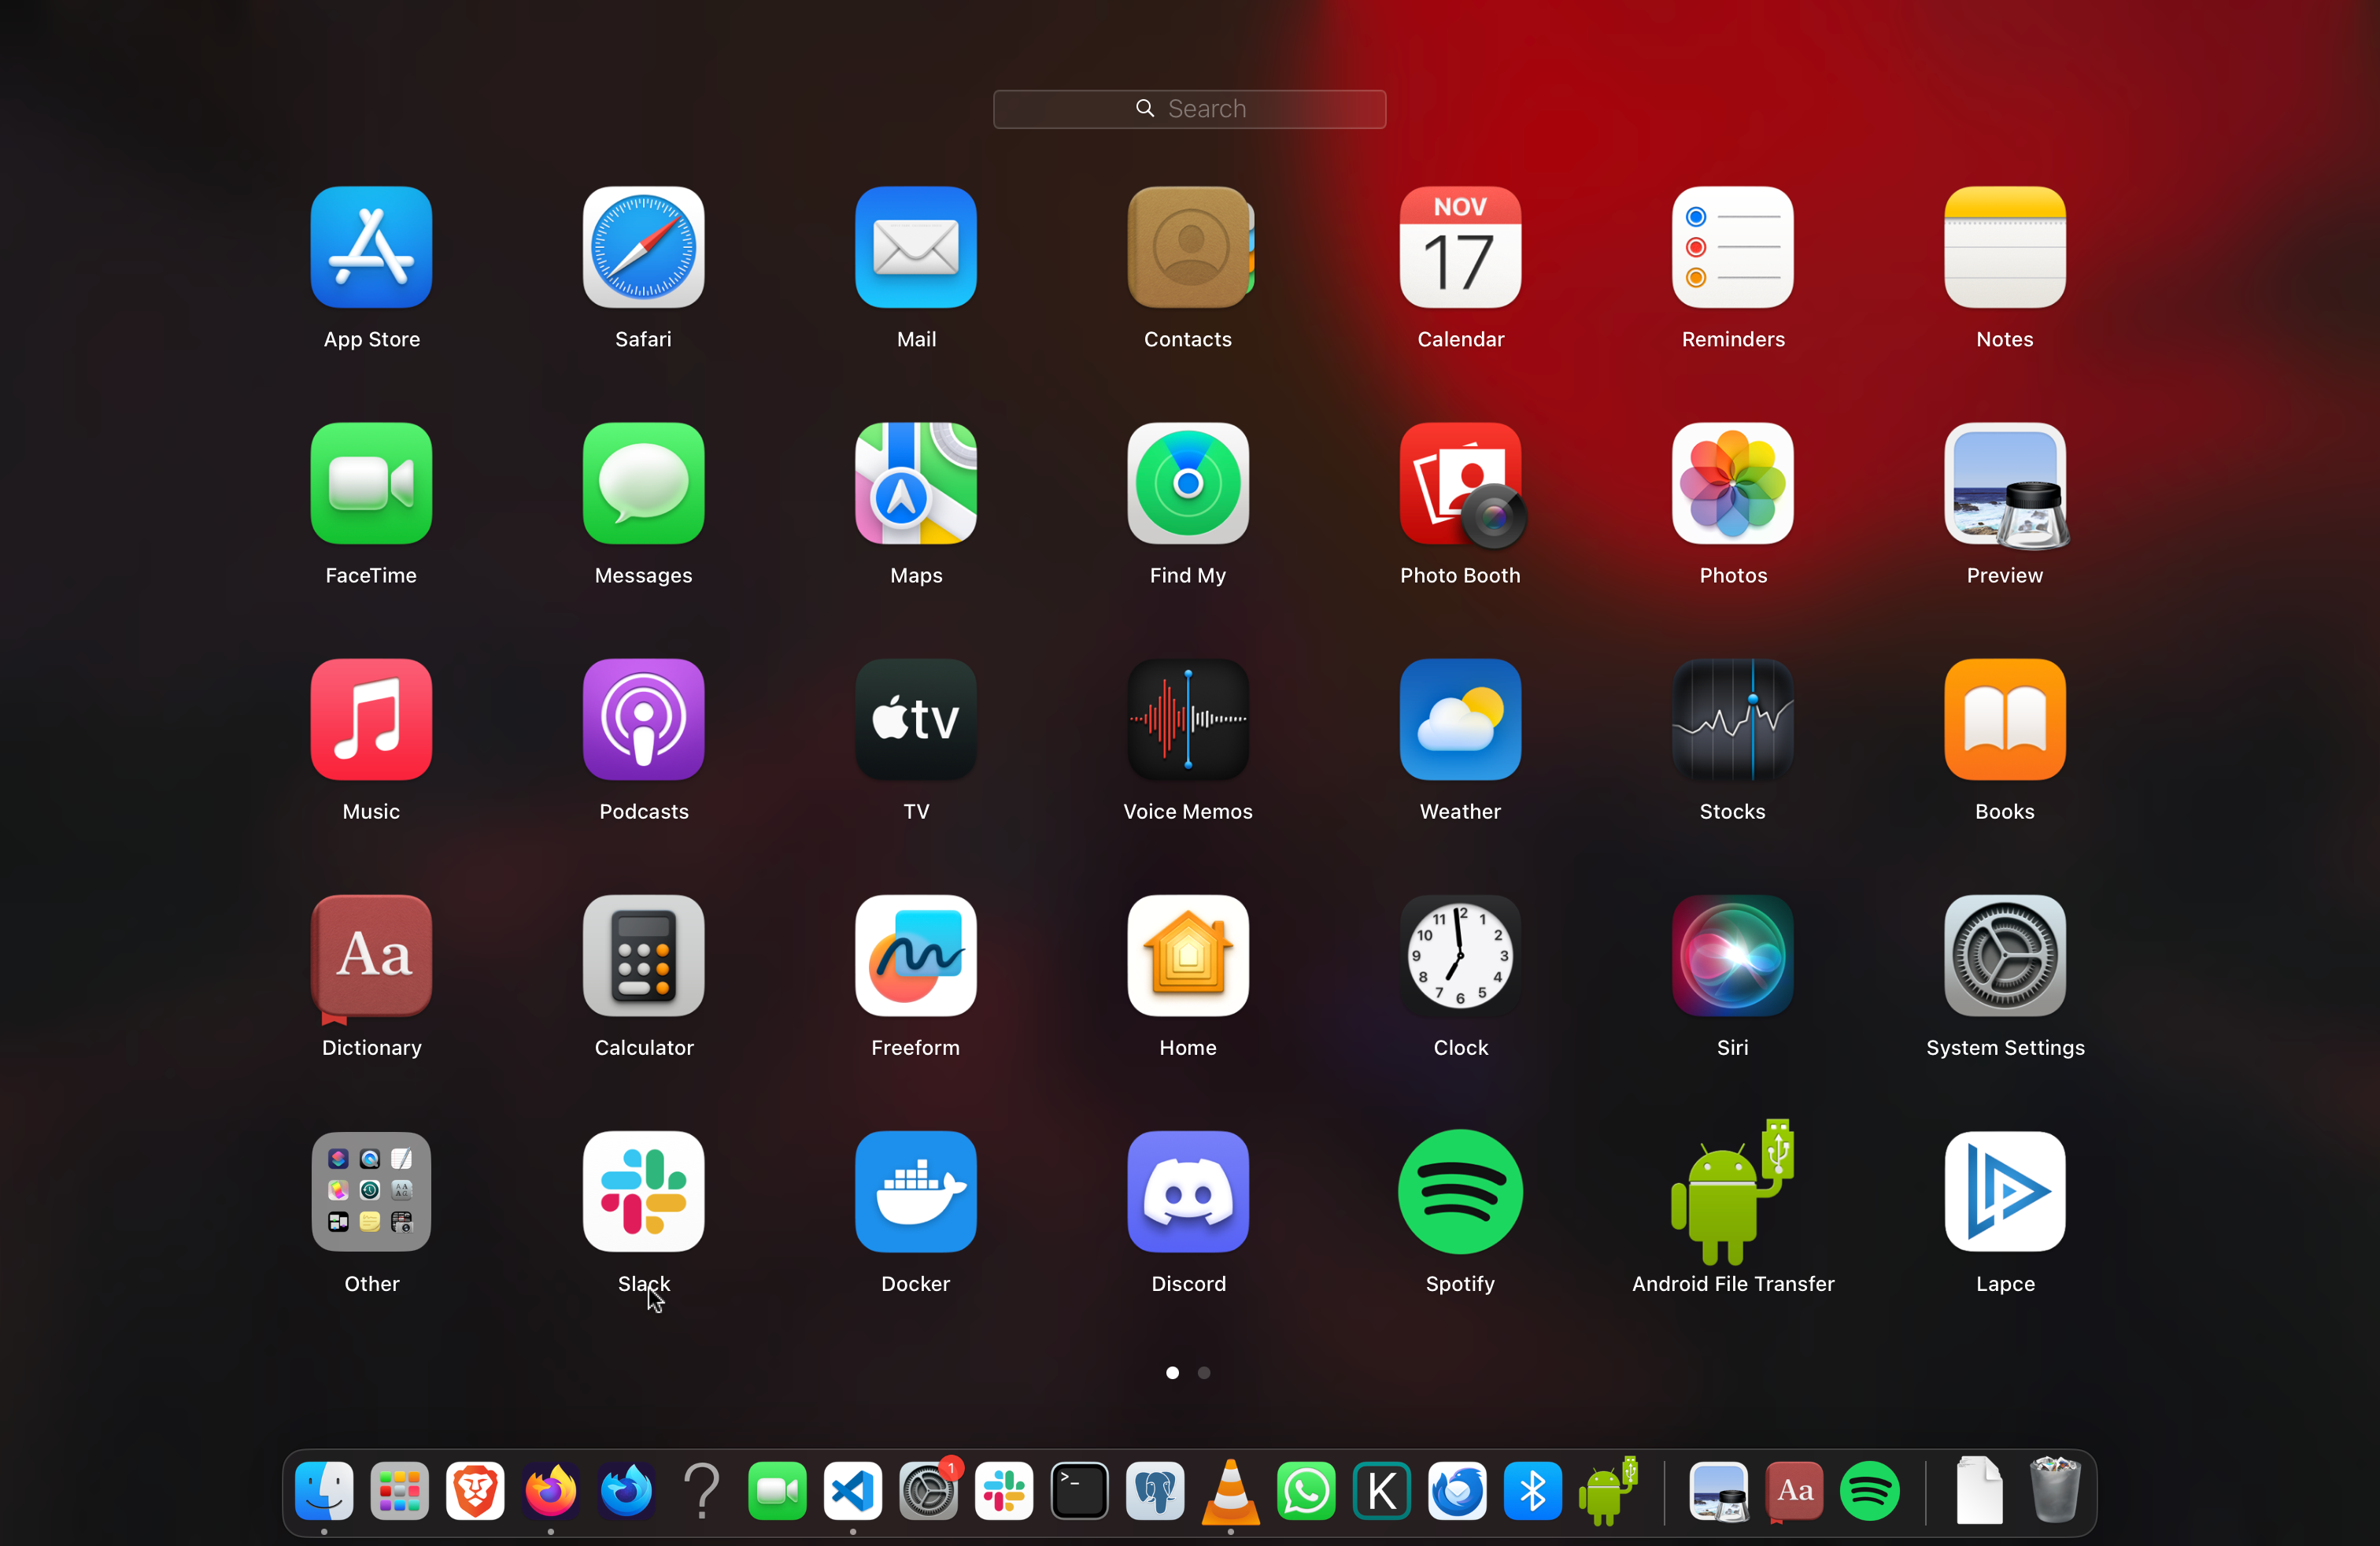
On an average computer, there are several software packages. By this, I mean the likes of Apple store, Safari, Slack, Spotify, etc. as seen in the picture below. These packages don't just work out of the box; without the operating system managing the system processes, and other important software like the boot loader1 that helps to start up the computer, they cannot be downloaded or used. There's a lot more technical detail regarding Operating Systems, feel free to do some external reading to suit your interest.
The operating system is, perhaps, the most important software that a computer runs; it manages the computer's hardware, software, memory, and processes. You can't see it like the other software packages that you use, but it operates beneath them all.
The operating system belongs to a category of software called System software, while the other category includes all forms of software that you interact with daily as a conventional computer user; this category is known as Application software.
Other examples of system software are Compilers and Interpreters2 which was introduced in module one.
The application software would mean the myriads of tools we use everyday, like the Internet browser, word processors, image viewer.
A small program that acts as an intermediary between the hardware and the Operating System
Common Operating systems
As of the time of this writing, there are two (2) major kinds of operating systems for mobile devices, the Android Operating system and the iOS. However, we won't be discussing them because our focus is on the computer environment encompassing desktops and laptops.
In the computer environment, we have a three major Operating Systems namely;
There are also some relatively unpopular ones, like Google's Chrome OS, nixOS, Redox OS, and numerous others.
Linux
Linux isn't a specific operating system, rather, it is a family of operating systems.
Think of it as a fruit basket, the content of this basket is called distro, a fancy word for distribution. Popular Linux distros include Ubuntu, Kali, ParrotOS, Cent, Suse, and Fedora.
They all have their strengths and preferred use cases.
For instance, Ubuntu is often used to run servers, robots, and Software development, while ParrotOS and Kali are used for penetration testing otherwise known as hacking. Explaining these distros in detail is beyond the scope of this book, however, you can surf the internet for more information about them.
The mac Operating system
macOS is an Apple-owned open source software that powers all apple computers.
Windows Operating system
The Windows operating system is a closed source --- proprietary software, owned, managed and distributed by Microsoft.
Module Review
In this module;
-
We examined the importance of the operating system
-
Briefly discussed the common operating systems for mobile and desktop/ environment
Module review
And now, a quiz:
Introduction to Shell scripting
In the last module we discussed operating systems.
In this module, you'll learn one of the most important concepts required for any serious programming task and that's Shell scripting. We'll start by learning what the Shell is and common Shell commands.
For questions and clarification on any topic, consider raising them in the Backend for Humans Discord server.
Learning expectation
At the end of this module, you should be able to:
-
Explain what Shell is
-
Perform some basic shell scripting
-
Give examples of the different kinds of Shells we have.
Learning requirement
For this module, you need:
-
Vscode
-
Windows Subsystem for Linux (Windows)
Installing the necessary tools
To get started we'd install VS code for all platforms then proceed to installing WSL for Windows user. If you run into any issue, consider asking for help on the Backend for Humans Discord server or searching online
VS code
VS code is a cross-platform and one of the widely adopted text editor. There are other alternatives such as Vim, IntelliJ IDEA, Atom, Zed, Helix and many more.
The choice of VS code as the text editor for this resource is largely influenced by the community adoption and ease of use. If you are an experienced user, you are welcome to try out any alternatives.
That said, proceed to https://code.visualstudio.com/ to download the software.

WSL (optional - for Windows users)
Windows Subsystem for Linux (WSL) is a feature of Windows that allows you to run a Linux environment on your Windows machine1
In the last module we learnt about operating system and we established the Linux, Mac and the Windows operating systems as the major operating platforms for desktop environment. The Linux and macOS are also known and referred to as the Unix-based operating system
The goal of WSL is the enable Windows user to use their laptops in a way that is originally exclusive to Unix-based operating system users.
To get started see the installation instruction at https://learn.microsoft.com/en-us/windows/wsl/install.
https://learn.microsoft.com/en-us/windows/wsl/about
With the necessary tool out of the way, let's get started!
What is a Shell?
Shell is a special user program that provides an interface to the user to use operating system services. Operating systems include opening a file, deleting a file, opening a program, renaming a file, etc.
Essentially the Shell accepts human-readable commands from input sources such as keyboard-entry or file(Shell scripts) and pass this to the operating system to execute.
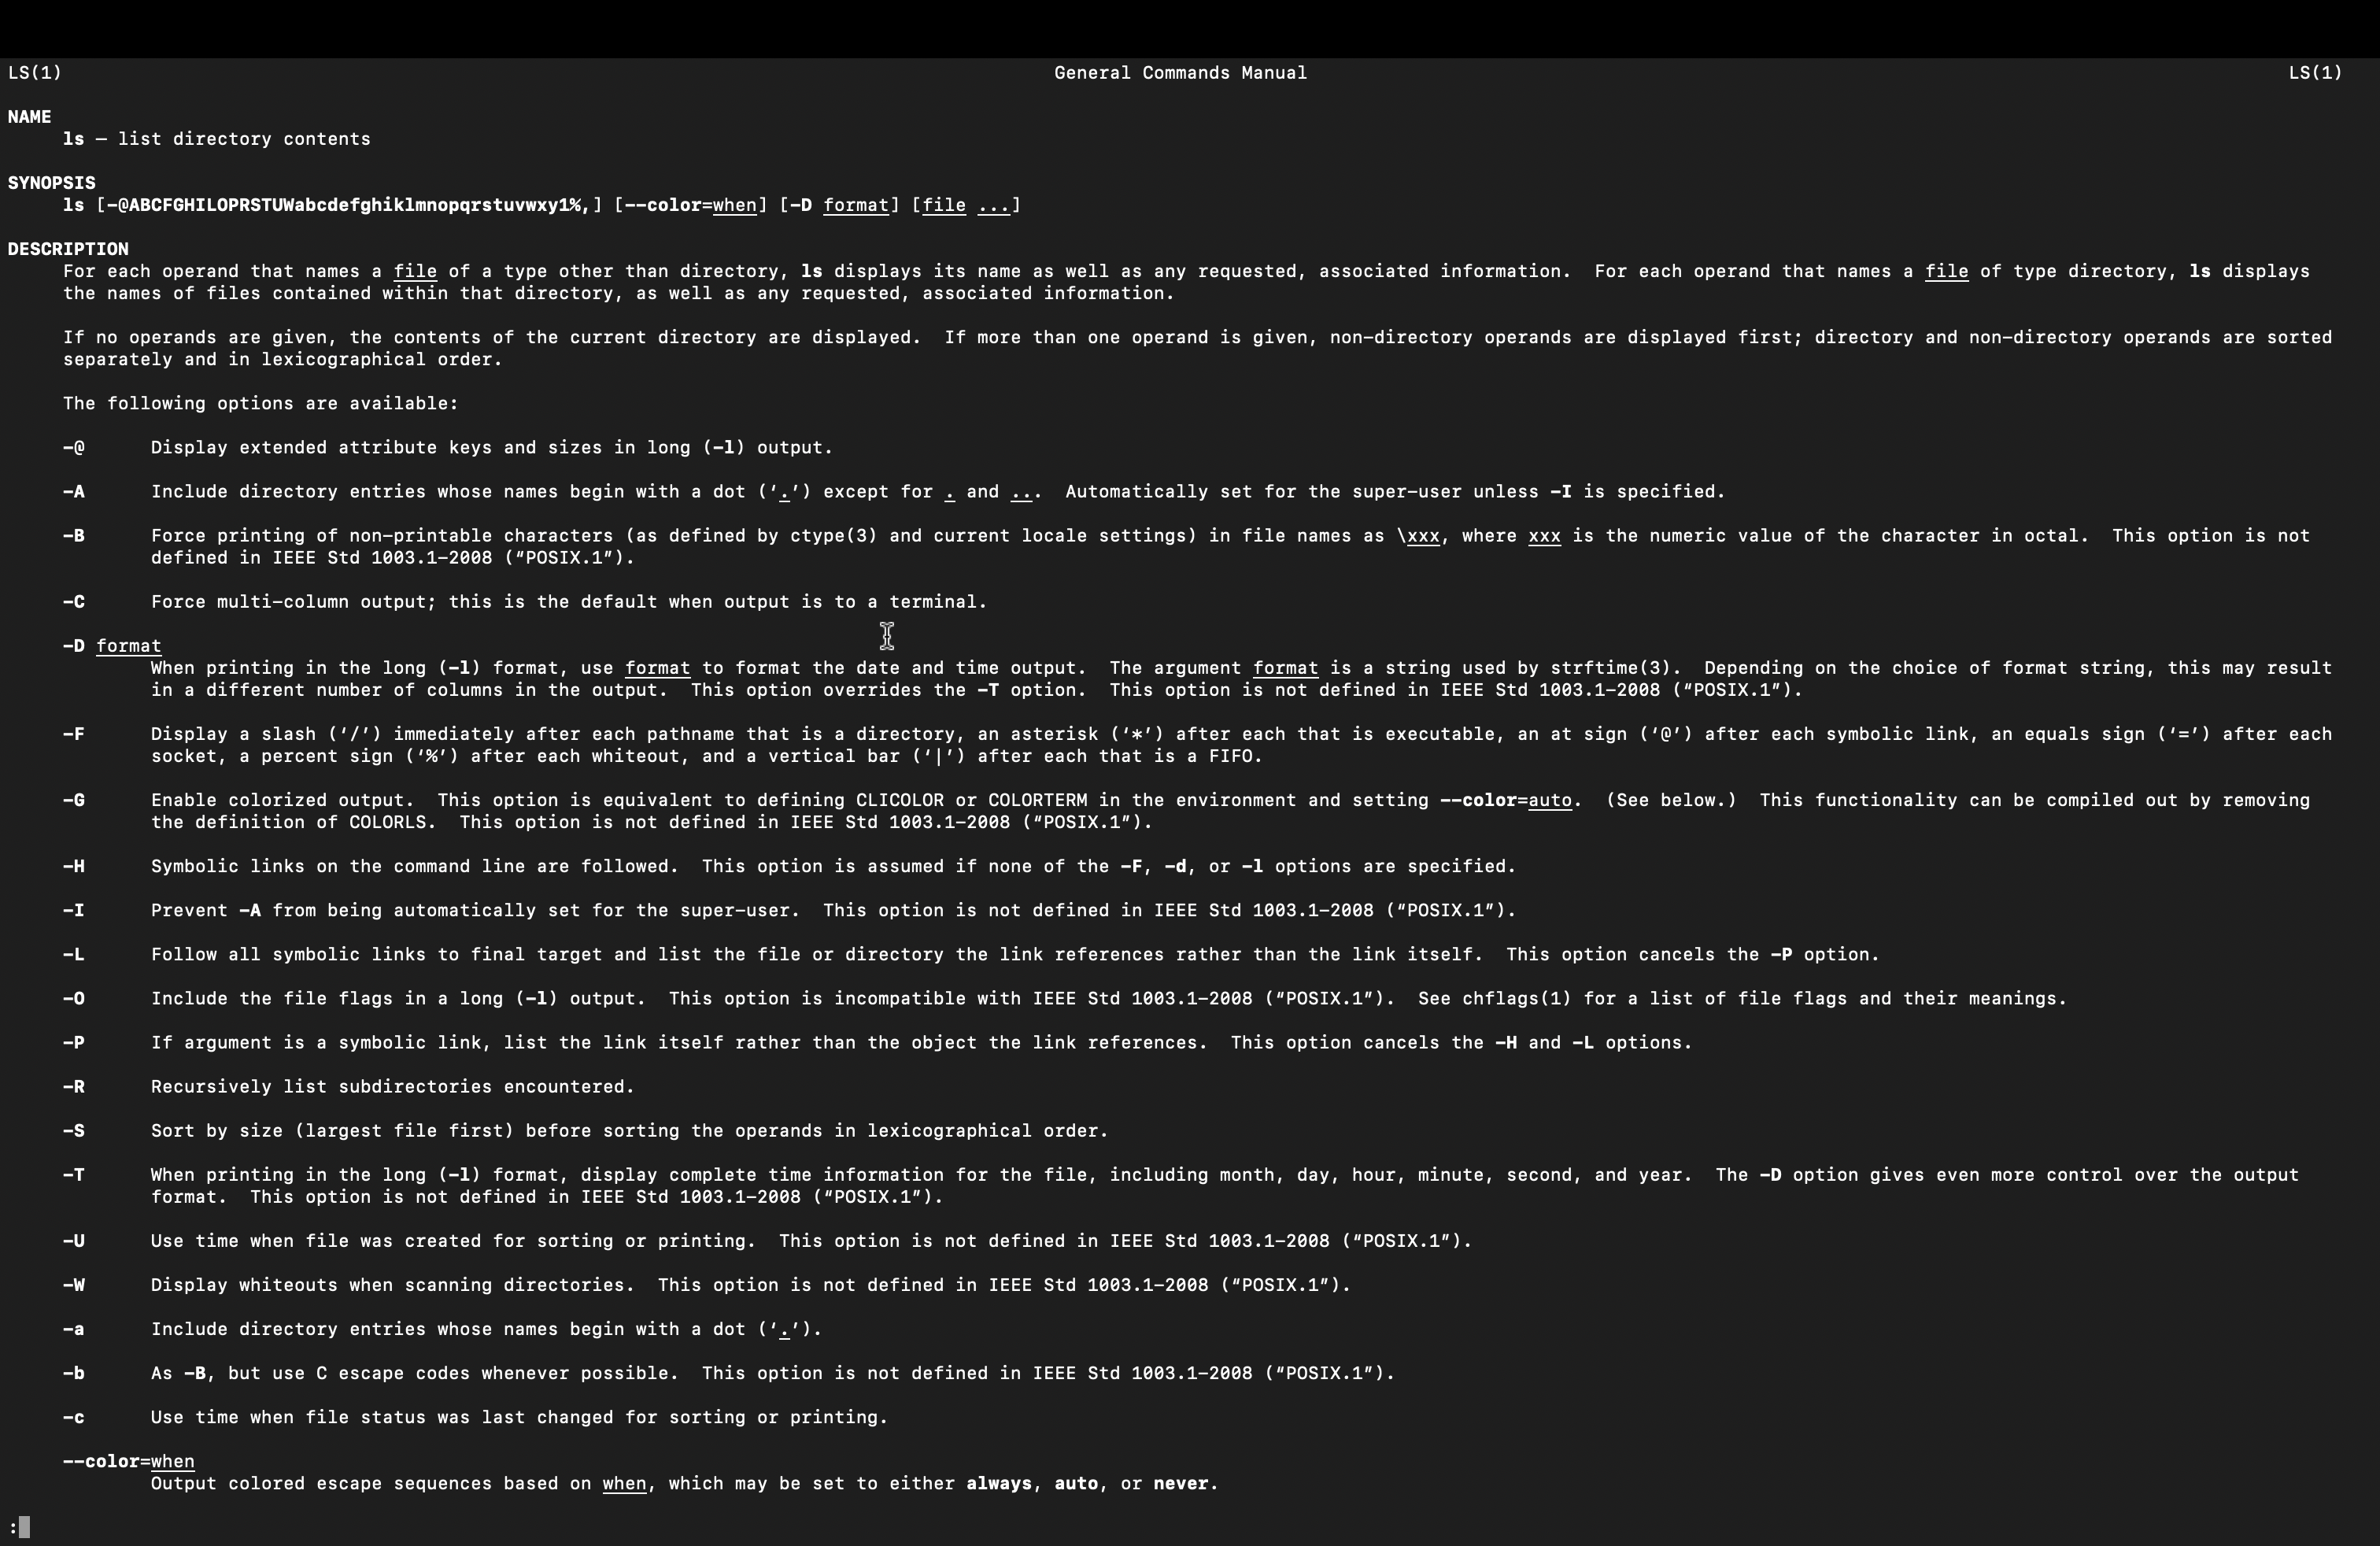
Put simply, the Shell is a special kind of kind of software that let you do some tasks from the command line interface (CLI).
A CLI would typically look like the image below
Our focus on this module is working with the CLI. Although, the concept of Shell
as we know it, is typical to Linux and Mac operating systems otherwise known as
Unix-based operating systems. The Window operating system provides cmd.exe and
powershell as equivalents of the Unix-based systems' CLI. It would suffice to
say that, the cmd.exe and powershell can also be used to interact with the
operating system. However, and, for uniformity, we will only be interacting with
the Unix-like shells. The WSL installed earlier in this module make it possible
for Windows user to do this.
In the Unix-based systems, we have different kinds of Shell interpreters, these include:
- bash - Bourne Again Shell
- zsh - Z Shell
- csh - C shell
- ksh - KornShell
- sh - Bourne shell
- fish - Friendly Interactive Shell
tip
An Shell interpreter, like interpreter studied in module one, is a program that takes a Shell command and translate it to something the computer can work with.
This book will focus solely on Bash because it's quite popular and probably the most wildly adopted. Bash syntax is also compatible with other kinds of shell.
On Windows based systems, configuring WSL might be tricky especially without prior experience with the CLI. I have included a video by Gary below which is more than enough to get you started.
Learning Shell scripting
What is Shell Scripting?
Shells are interactive interfaces that accept commands from a user, typically through the keyboard. For tasks beyond routine instructions, this becomes a very difficult thing to do, so the scripts are saved in files and passed to the Command Line Interpreter (CLI). This is Shell scripting in a nutshell.
To begin;
-
Create a folder on your desktop, call it
workspace. Ensure to use lowercase letters. -
Open the folder in your terminal.
Now we are ready to delve into shell scripting.
Shell commands
Shell commands are special words you pass to the command line interface to perform some task. For instance, the command mkdir is used to create a directory, ls is used to list the content of a folder, cat is used to print the content of a text file. In the next few pages, our focus will be on trying out these simple commands.
echo
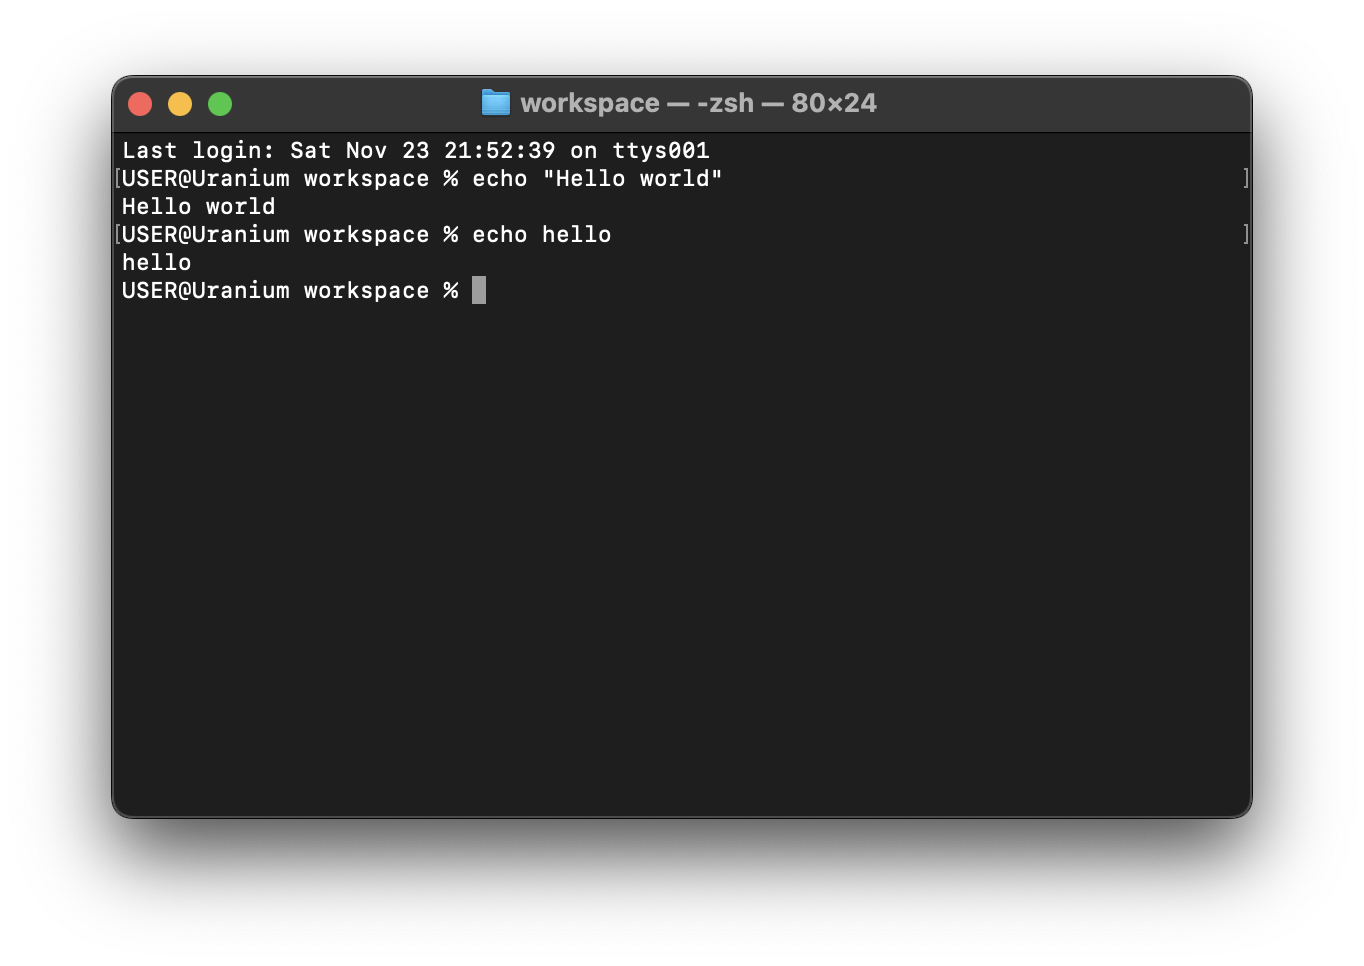
The echo command is used to print text in your terminal.
Hello, World

Note that the string to be printed here is "Hello world".
If it is a single world, like hello, you can safely ignore the quotation marks.
hello
clear
The clear command is used to clear the screen.
clear
pwd
The pwd command -- Print Working Directory, is a Unix-based system commands that shows you the full path of the folder you're working in.
pwd

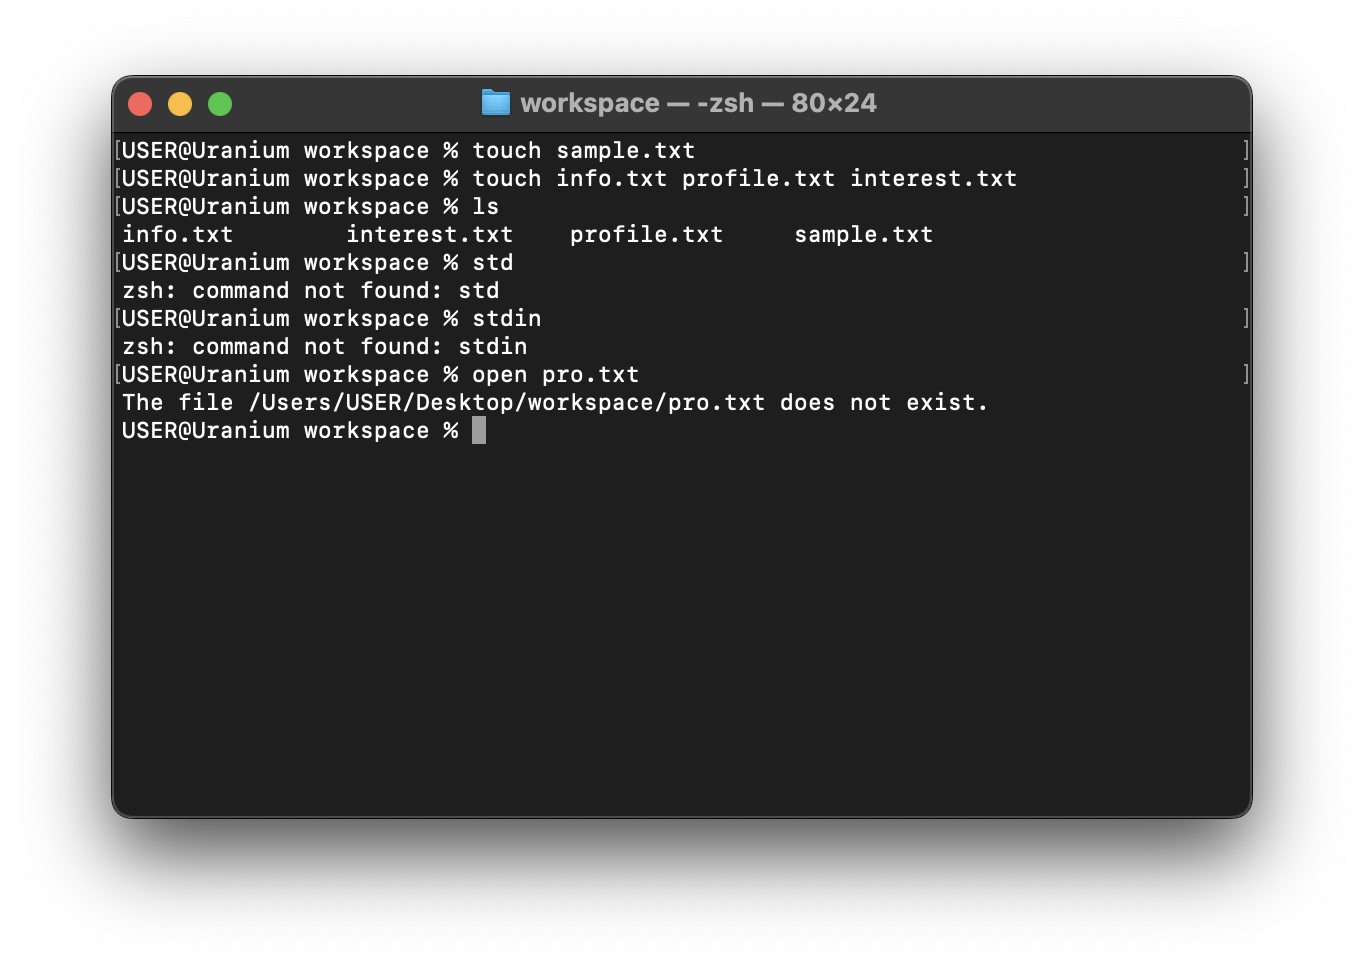
touch
The touch command is used to create files. To create files in the current folder, provide the file name and file extension.
Let's create a sample.txt file.
touch sample.txt

To create multiple files, add a space between the file names. Add a comma and a space for Windows.
touch info.txt profile.txt interest.txt

ls
The ls command stands for list and is used to list the content of a directory.
In the previous module we created four files sample.txt, info.txt profile.txt interest.txt. The ls command let's us see these files.
ls

stdin, stdout, stderr
Computers use streams to accept input, return output, or inform its user when an error occur. These streams are stdin, stdout and stderr respectively.
Contrary to what we have learnt in this module, especially about commands, stdin, stdout and stderr are not commands.
stdin stands for standard input, which is the default input device a program uses to read data. It is commonly used to read keyboard input, but it can also be a file or other input devices.
The terminal we have been using so far is a very good example of stdin, we can pass keyboard input to the computer, just by typing in the terminal.
stdout stands for standard output and refers to the default output stream in a computer program. It is the channel through which a program displays its output to the user or another program. When you run a program and it produces some output, such as text or numbers, that output is typically sent to the stdout stream.
The terminal we have been interacting with is also an stdout medium. Put simply, we are able to pass input (stdin) and get output (stdout).
stderr stands for standard error - this connotes when an error is returned. For instance, you get an error when you are trying to open a file that does not exist.
Writing content to file
We learnt about creating files with the touch command but these are just empty files. Let's go on to add some content to this file.
The echo command we discussed earlier can be used to write stuff to a file.
Typically, the text passed to the echo commands, other wise known as the argument gets printed to the stdout, however we can "pipe" this value to a file
echo "unless you are permitted to share!!" > info.txt
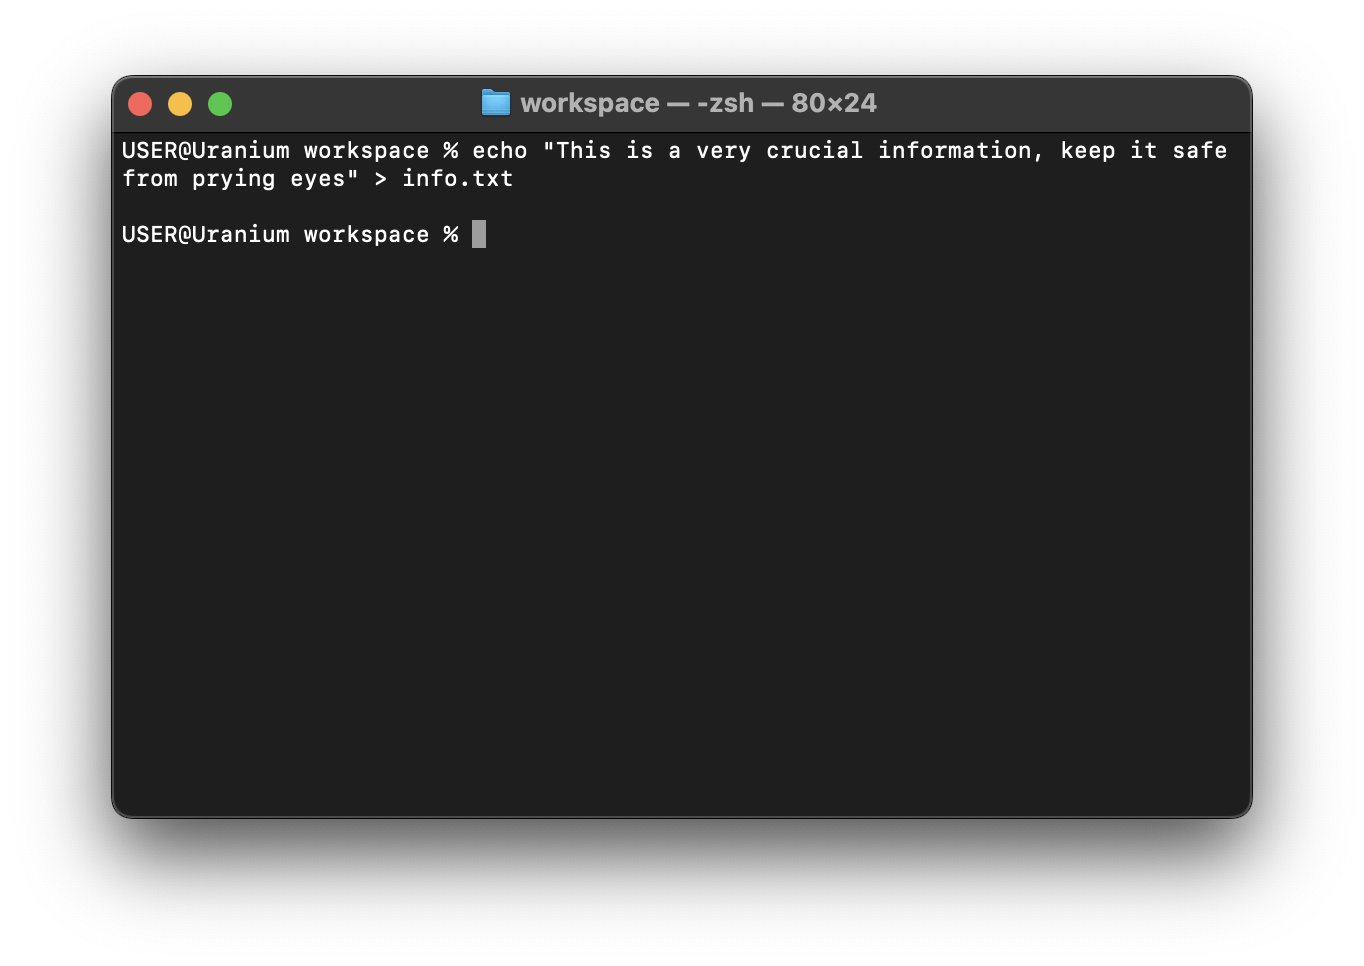
If the file does not exist when you pipe the content of stdout or stderr to a file, the file will be created with the intended content.
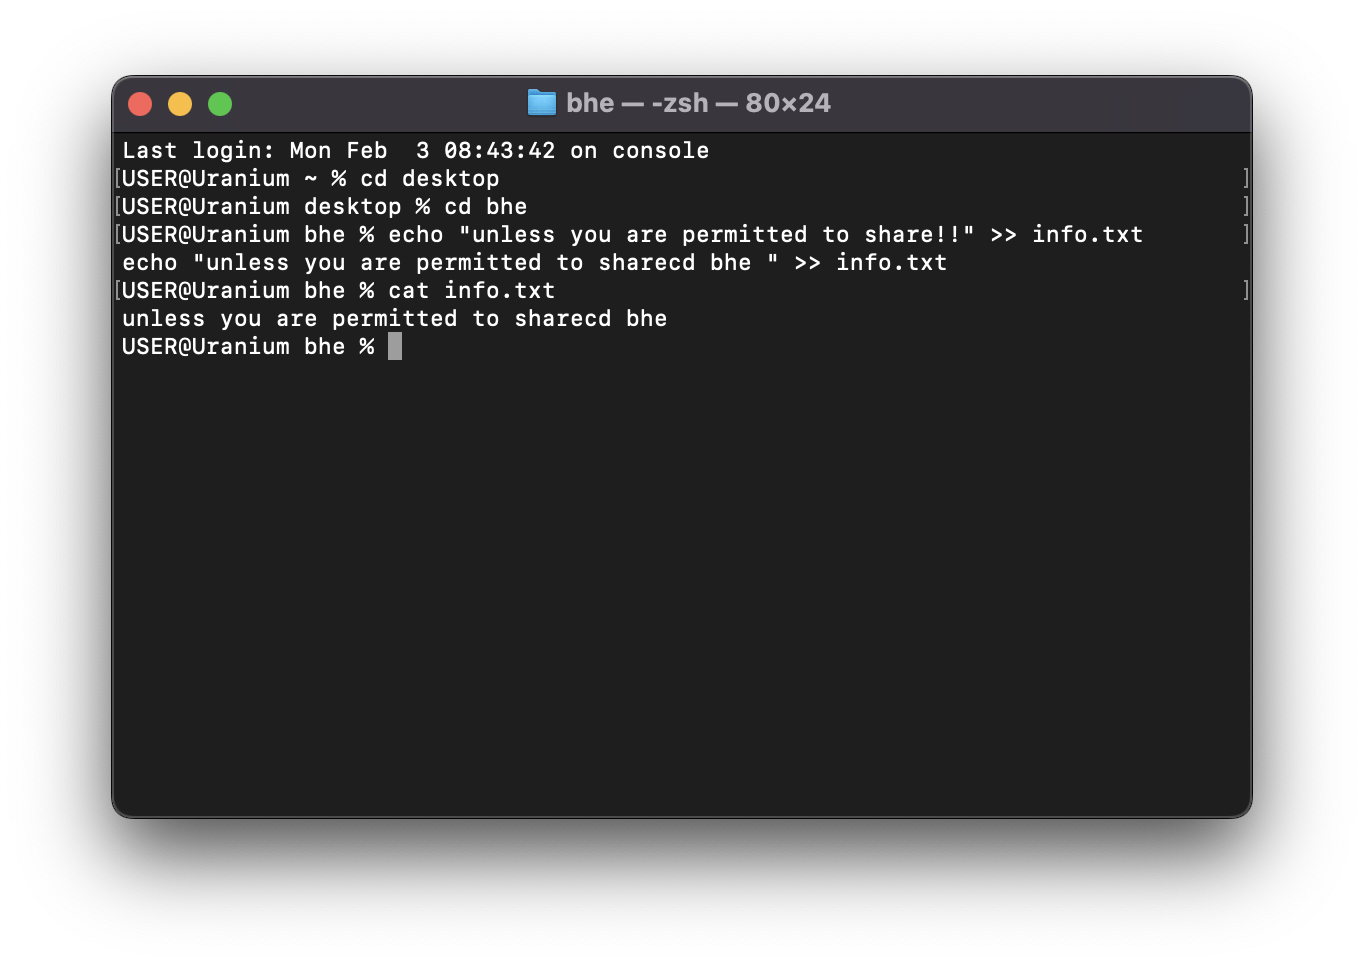
You can also append additional content to an already existing file. To do this, 'pipe' the new content to the file with a double arrow.
echo "unless you are permitted to share!!" >> info.txt
Inspecting the content of a file
In the previous lesson, we learnt about writing content to a file but what if we want to view the file content?
The cat command takes the file name as an argument and displays its content.
cat info.txt
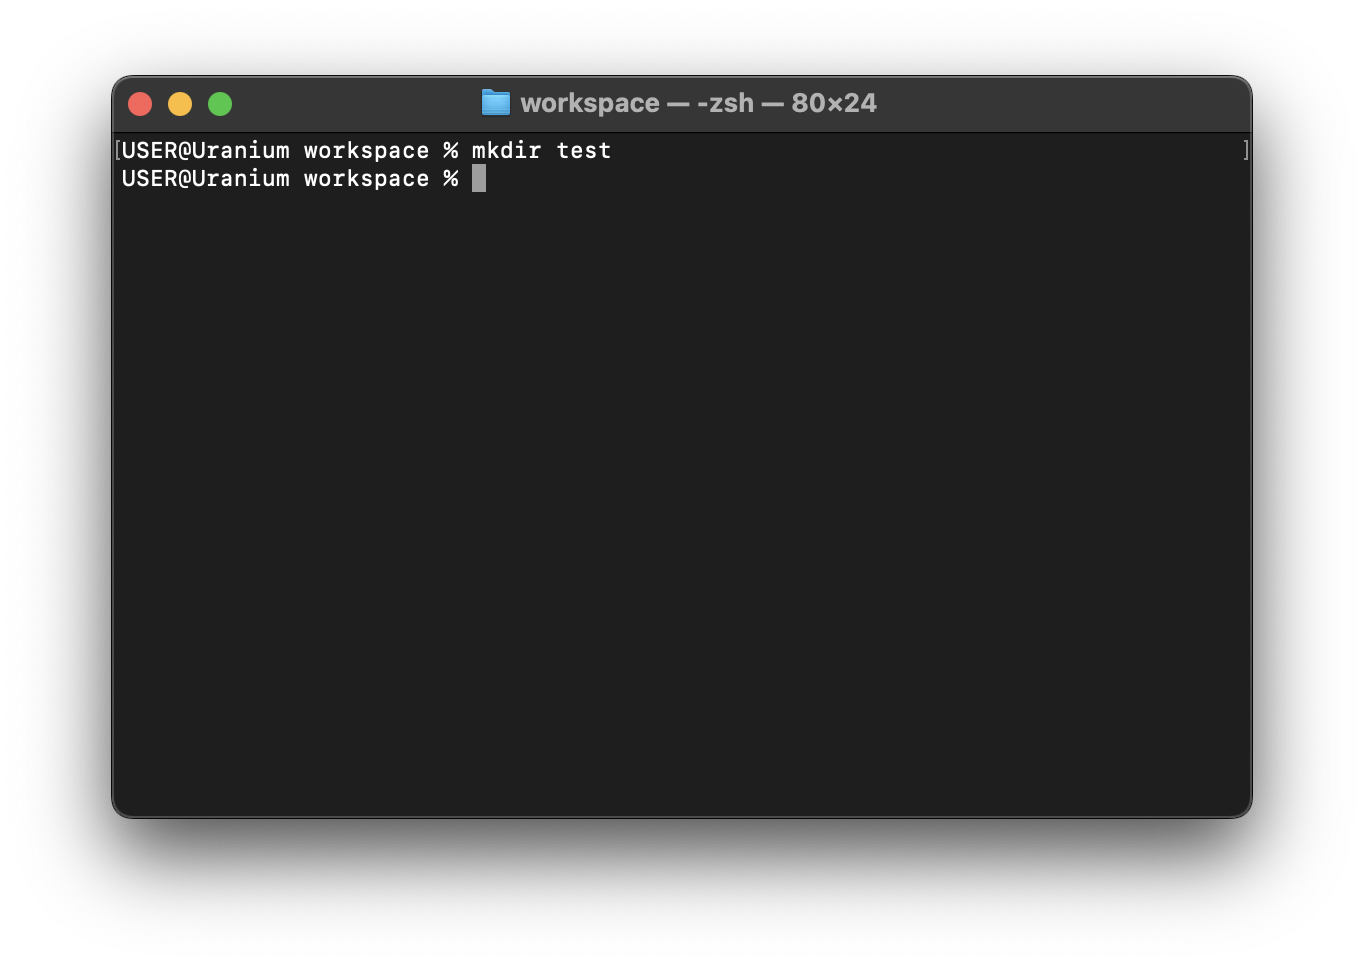
mkdir
So far, we have learnt how to work with files. mkdir allows you to create a folder and like the touch command, you can pass one or multiple folder name arguments.
To create a single folder, add a space after mkdir and then pass the intended name of the folder.
mkdir test
Creating multiple folders
You can create multiple folders by separating the folder name arguments with space.
mkdir first_folder second_folder third_folder
Afterwards, you can use the ls command to list the newly created files.
Nested folders
Consider the following folder structure, where the parent_directory contains a root_directory which in turn holds a sub_directory and another_sub_directory.
|
--parent_directory
|
----root_directory
|
--------sub_directory
|
--------another_sub_directory
|
To nest a directory nested_dir inside the sub_directory from the parent directory, do this:
mkdir ./root_directory/sub_directory/nested_dir
Voila!
rmdir
The rmdir is used to delete a directory. It does the opposite of the mkdir command.
Deleting a folder
To delete a folder, use:
rmdir folder_name
If the folder is empty then it would be deleted, otherwise you'd get an error similar to rmdir: folder_name: Directory not empty.
To circumvent this, pass an -r flag which stands for recursive, and use rm instead of rmdir. This would delete the directory and it's content.
rm -r folder_name
Deleting multiple folders
To delete multiple folders, use the commands as shown below.
rmdir -r first_folder second_folder third_folder
Remember, the -r flag is optional and you are expected to use it only when you want to forcefully delete folder items.
Module review
So far, we have explored popular shell commands directly from keyboard inputs but we've barely scratched the surface of shell scripting. In the next section, we will learn how to execute these commands as scripts from a file. I have included links to additional resources below.
Additional resources
-
Bash reference (reference)
-
basic shell commands (blog post)
-
Vs code for beginners (video)
Module review
And now, a quiz:
Writing shell scripts
In the previous module, we introduced common shell commands and executed them directly from the shell terminal. We'll build on previously established concepts and show you how to write and execute shell scripts in this module. You might need to review module 4 if this is your first shell scripting encounter.
Learning expectation
At the end of this module, you should be able to:
-
Explain what a shell interpreter is
-
Write and execute a shell script from a file
-
Make a shell script an executable
-
Read a shell file and explain what it is supposed to do.
Learning requirement
For this module, you need:
-
Vscode
-
Windows Subsystem for Linux (Windows)
See the setup instructions from module 4
Your first script
To begin, open the VS code then see the video below for setup instructions to create a folder
Creating a new folder
To create a file in Vscode use can use either of the following approaches.
Method 1
The following video instruction walks you through how to create files in Vscode.
Method 2
Press Command + ` on macOS, the ` key is usually under the Esc key.
For windows users, press the windows key Win + `. The command will open the Vscode integrated terminal, from where you can create a new file.
With that out of the way, let's go on to our first script.
Writing our first script
Create a file named hello manually or use the touch command. Yes, some programmers prefer to use the .sh extension for their scripts, such as hello sh, it is not required, and we'll not be doing that. In the newly created file, add the following content.
#!/bin/bash

echo "Hello, World"
From the terminal, execute sh hello.
This prints Hello world to the terminal.
 % sh hello
Hello, World
Anatomy of your first script
Your first script looks like this
#!/bin/bash

echo "Hello, World"
Lets analyze the different components of this script.
-
Line 1
#!/bin/bashis divided into two parts. The first part with the annotation#!is called shebang - pronounced "" ʃɪˈbæŋ"" and it is a very important ingredient for a Shell script to work. The other part/bin/bashtells the computer how to interpret the file, it can be translated as "use bash to interpret this". -
Line 3 is the same as the echo command we learnt in module 4.
As you advance, you will discover that it is possible to use programming languages like Perl, Python, JavaScript, Lua, and many more for shell scripting. The central key to unlocking this is indicating the interpreter to use.
To exemplify this, the script above can be rewritten in JavaScript as;
#!/usr/bin/env node

console.log("Hello, World");
Note that the first line is different!
The key takeaway from this script anatomy breakdown is that;
-
A shell script must begin with a shebang, accompanied by the script's interpretation specification
-
A shell script does not need to be saved with a file extension
-
You can combine multiple commands within a shell script.
Making scripts executable
Earlier in this module, you wrote the first script, and executed directly in the terminal using the sh <file_name> commanand. It becomes tedious to do this repeatedly and that leads us to making a script an executable.
You can make a script executable.
Making a script executable means that you dont have to compile it every time you want to run it which is what the sh <file_name> command does. Instead, you can make it executable once and run it directly from the terminal as many times as you want.
This is done by using the chmod u+x <file_name> command to compile and change the permissions of the file, allowing it to be executed as a program.
Consider the previous example
#!/bin/bash

echo "Hello, World"
To make this executable, do:
chmod u+x hello
Then to run it, do:
./hello
You should get the same result as before, but this is more efficient than typing sh hello every time.
As a final example, if our file name is delete_all and we want to make it executable and run it, we can do:
chmod u+x delete_all
./delete_all
That said, we're done here! Over to the next one.
Using Variables
Variables are not only typical to shell scripting, we'll see them a lot in the modules to come; they are like special containers for holding values. The values they hold can be just about anything you can think of and they are identified by the name we give them.
Variables allow us to easily mutate (change, update) a value.
Before going on to dealing with variables in Shell scripting, let's examine how variables are named, and how they work.
A closer look at variables
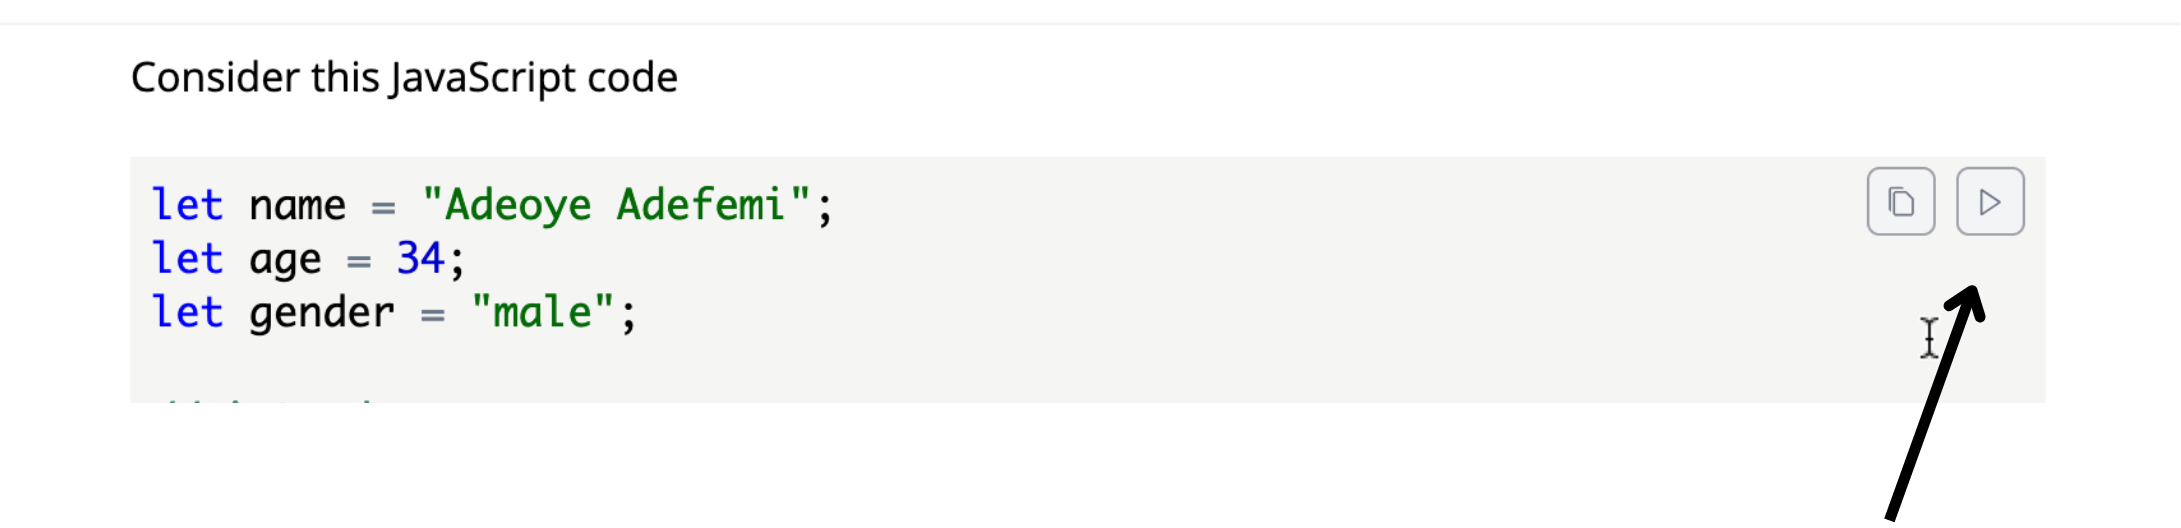
Consider this JavaScript code:
let name = "Adeoye Adefemi";
let age = 34;
let gender = "male";

// introduce me
introduce_me(name, age, gender);

// update my age, and name
age = 45;
name = "Opeeolluwa";

//introduce me again using the new age and name
introduce_me(name,age,gender);

// introduce me again
age = 60;
name = "Adeoye Adefemi Opeoluwa";
introduce_me(name, age, gender);


function introduce_me(name, age, gender) {
  console.log(`My name is ${name}, I am a ${age} years old ${gender}. `);
}
When you are done, click on the play icon on the top right corner to see the code in action.
The code, when run yields:
My name is Adeoye Adefemi, I am a 34 years old male.
My name is Opeeolluwa, I am a 45 years old male.
My name is Adeoye Adefemi Opeoluwa, I am a 60 years old male.
The key lesson here is that, the terms age, name, and gender made it possible to quickly update the values and to use them in multiple places. I encourage you to edit the code, use your name in place of mine, then run the code again.
These three things; age, gender and name as used here are called variables.
At first age stored the value 34, then I updated this value to 45, and finally 60.
Naming Variables
As a rule in many programming languages, or toolchain like the Shell scripting we are studying, it is often encouraged that:
-
A variable be descriptive
-
A variable starts with a letter followed by a letter, more alphabets, or underscore.
Here are a few examples:
my_name = "Adeoye"
my_country = "Nigeria"
title_of_a_king = "King Jaja of Opobo"
The first one, talks about my name, it's very descriptive, the next is my country, note that the variable my_country is very descriptive, and the same can be said about the last example.
With this out of the way, let's address variable naming conventions.
Variable naming conventions
As of today, there are 5 conventional methods of naming variables, they are as follows:
-
snake case
-
upper snake case
-
camel case
-
pascal case
-
kebab case
Snake case
In snake case, you separate your variables with underscore. For example,
my_name, my_friends_name.
Upper snake case
Like the snake case, you separate your variables with underscore, however these words must be capitalized. For example, MY_NAME, MY_FRIENDS_NAME. This is often used for variables that would not change, otherwise knows as constants.
Camel case
In camel case, you capitalize the first letter of every word except the first. This gives myName , myFriendsName.
Pascal case
Very similar to camel case, just that you capitalize the first letter of each word like this MyName, MyFriendsName.
Kebab case
The kebab case is very similar to the snake case, just that hyphens are used in place of underscores. For example, we have my-name, my-friends-name.
Variables in shell scripting
Finally, here we are, variables in Shell scripting. Consider a minimal reproduction of the JavaScript code, I'll create a file var and add the following content.
#!/bin/bash

name="adeoye"
age=4

echo $name
echo $age
On line 3 and 4 we declared, the variables name and age. Then on line 6 and 7 we print these values using the echo command.
Let's proeed to make this executable and run it.
chmod u+x var
./var
Notice how when we needed to access the variable values we had to prepend it with a dollar sign $. This is a very important concept when working with variables in Shell scripting.
The executed script output should be similar to this:
adeoye
4
Using arrays
Arrays are a special type of containers that hold multiple values at the same time.
For instance, the rainbow is made of 7 colors. We can create an array variable that holds all the colors of the rainbow.
Create a new file named arr and add the following lines of code to the file.
#!/bin/bash

rainbows=(red orange yellow green blue indigo violet)

echo "${rainbows[@]}"
Make it this file executable and run the script.
You should see the following output:
red orange yellow green blue indigo violet
Accepting inputs
At times, you want to pass inputs to your shell scripts, this can be achieved
using the read keyword.
#!/bin/bash

echo "What is your name?"
read name

echo "How old are you?"
read age

echo $name
echo $age
The lines 4 and 7 will read the inputs from the terminal and store them in variables name and age, respectively.
Copy the above to a new file, say argz and make the script an executable. Run the script and interact with the program on your terminal.
For example;
$ ./argz

What is your name?
Adeoye
How old are you?
45

Adeoye
45
When I executed the program, I was greeted with the What is your name? question. I responded with my name Adeoye. Thanks to the read keyword, this name was assigned and stored as the variable name. The same thing happened when I answered the How old are you? question, however, this time my response was stored as the variable age.
Ultimately, the program was able to precisely recall and 'echo' my responses to both questions because I made it read and accept them as variable values.
Conditional evaluation
Like variables, conditional evaluation is one of the key concepts you'll come across in programming. It is used to execute a certain action based on matched conditions.
Bash gives you four conditional keywords if, elif, else and fi.
-
Conditional evaluations must start with an
ifand end with anfi -
Conditional evaluations can contain zero or more
elif -
The base case or the fallback should be handled by in an
elsestatement
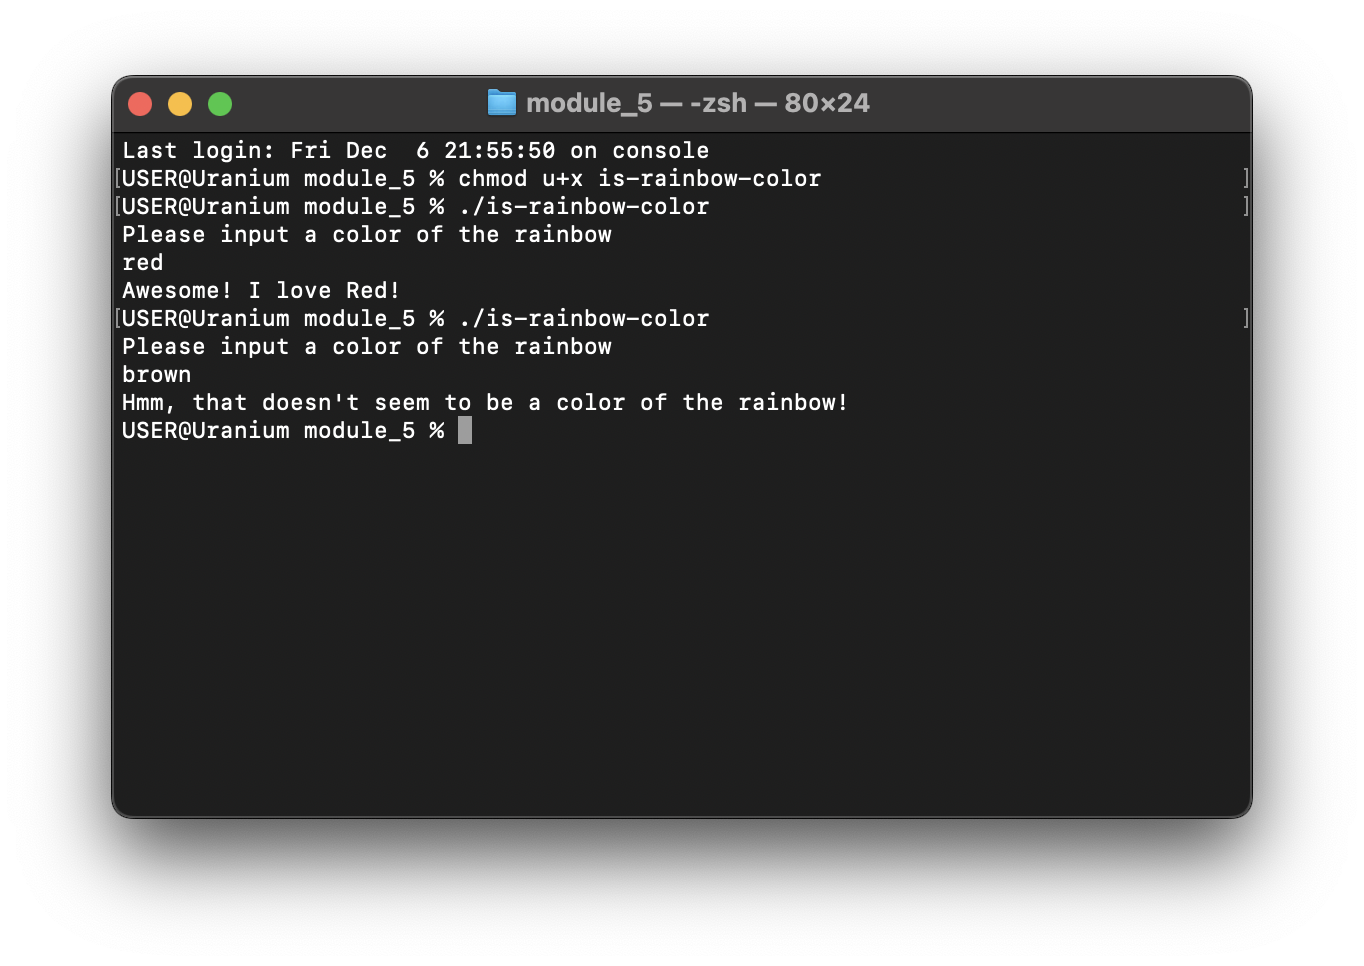
Consider the following example, we will read the input from the user and check if it is a rainbow color.
#!/bin/bash

echo "Please input a color of the rainbow"
read color

if [ "$color" = "red" ]; then
    echo "Awesome! I love Red!"
elif [ "$color" = "orange" ]; then
    echo "Bright and cheerful! Orange is great!"
elif [ "$color" = "yellow" ]; then
    echo "Sunny! Yellow is wonderful!"
elif [ "$color" = "green" ]; then
    echo "So fresh! Green is amazing!"
elif [ "$color" = "blue" ]; then
    echo "Cool choice! Blue is calming!"
elif [ "$color" = "indigo" ]; then
    echo "Unique and deep! Indigo is awesome!"
elif [ "$color" = "violet" ]; then
    echo "Elegant! Violet is beautiful!"
else
    echo "Hmm, that doesn't seem to be a color of the rainbow!"
fi
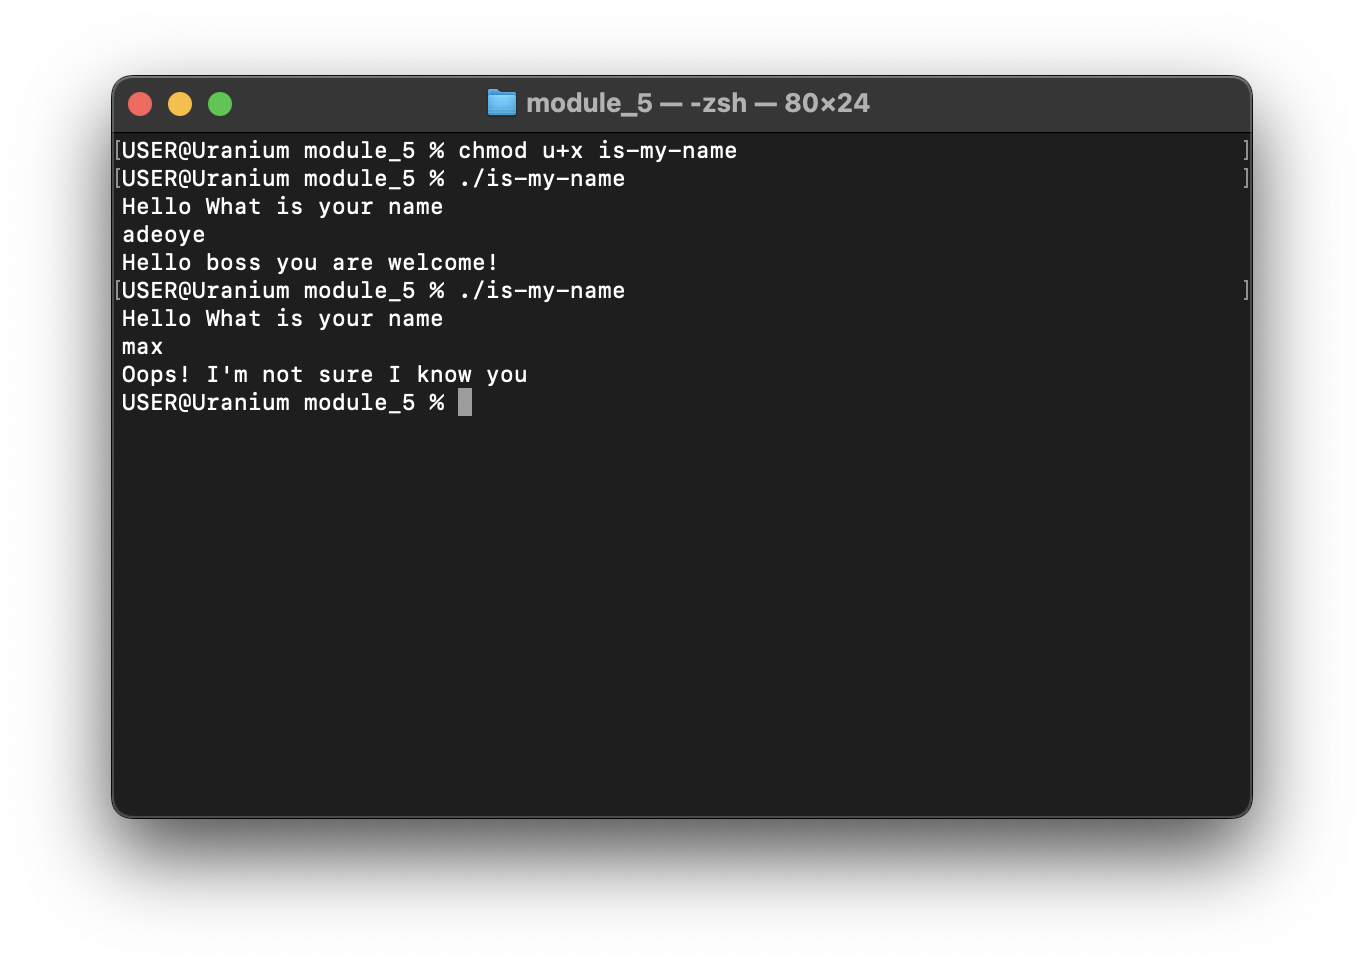
Consider Another example
If my name is "adeoye", print "Hello boss you are welcome!", if not, print "oops! I'm not sure I know you"
#!/bin/bash

echo "Hello What is your name"

read name

if [  $name = 'adeoye' ]; then
    echo "Hello boss you are welcome!"
else
    echo "Oops! I'm not sure I know you"
fi
Using for loops
The for loop is often used to iterate over a collection or a list of items and carry out an action.
Four ingredients are required to execute a for loop in Bash, for, in, do, and done.
Consider the array of rainbow colors we mentioned earlier while learning about arrays
#!/bin/bash

rainbows=(red orange yellow green blue indigo violet)

echo "${rainbows[@]}"
We can use a for loop to iterate over the array and print each item like this:
#!/bin/bash

rainbows=(red orange yellow green blue indigo violet)

for color in ${rainbows[@]}
    do
    echo "$color"
done
The combination of these four keywords literally means: for (every item) in (this container/variable/list), do (print the item), and (after the last item, you're) done.
So rewording this to suit the above example, we can say for every color in the rainbows array variable, do print the color, and after printing the last color, you're done.
Make the script executable and run it.
You should see the following output:
red
orange
yellow
green
blue
indigo
violet
The key takeaway here is that, while the echo command simply outputs the value of a variable or a string passed to it, a for loop executes nested commands for each item in the array, typically on a new line, and terminates after executing the last item.
In advanced lessons, you will learn how you can nest a for loop within an echo command and within another for loop.
Sample scripts
Here's an excerpt from a personal project which reflects the major the concepts discussed in this module.
#!/usr/bin/bash

# Define target platform and supported platforms
target="all"  # Example: "all", "android", "ios", "macos"
SUPPORTED_PLATFORM="android ios macos"  # Supported platforms for export
BINARIES_PATH="/path/to/binaries"  # Path to store the exported binaries
APP_NAME="myapp"  # Name of your app

if [ "$target" = "all" ]; then
    for platform in $SUPPORTED_PLATFORM
    do
        export $platform
        echo "Export completed for $platform"
    done
elif [ "$target" = "android" ]; then
    cp tauri/gen/android/app/build/outputs/apk/universal/release/app-universal-release.apk "$BINARIES_PATH/$APP_NAME.apk"
elif [ "$target" = "ios" ]; then
    cp tauri/gen/android/app/build/outputs/bundle/universalRelease/app-universal-release.aab "$BINARIES_PATH/$APP_NAME.aab"
elif [ "$target" = "macos" ]; then
    cp tauri/target/release/bundle/dmg/filesync_0.7.13_aarch64.dmg "$BINARIES_PATH/$APP_NAME.dmg"
else
    echo "Unsupported target"
    exit 1
fi
Explanation
The original script, found here, is used alongside Just1, a Shell command runner, to manage a codebase for building desktop(macOS) and mobile applications.
-
On line 1, we see the previously explained shebang in action
-
Line 3 to line 7 declared some variables whose values would be reused in multiple places
-
On line 9 to line24, we have
-
Conditional evaluation arms with copy the build application, from thesource to the destination
-
If
allis passed, it would copy all the supported targets, otherwise, itwould copy the built application for the stated platform.
-
Don't worry if you don't understand everything at a glance. Like I said, it is an excerpt from a personal project, so it should give you a glimpse of the real life application of what we've just learnt.
I'll encourage you to ponder on it for a short while, you should figure it out soon enough.
Additional resources
Shell scripting, much like many other things, requires time and practice to master. It is not something that can be fully learned in a single module. Below are a few valuable resources to help you learn more.
-
Heiner's SHELLdorado - UNIX shell scripting resource
-
https://www.shellscript.sh/ - basics of shell script
-
Shell Scripting Crash Course - Beginner Level - A video guide
Module review
In this module, we learnt about the process of saving your script to a file and executing it, as opposed to entering commands directly via the keyboard, as demonstrated in module 4. We also covered important concepts such as how to make your shell script executable, working with arrays, performing conditional evaluations, utilizing for loops, and reading shell scripts effectively.
Module review
And now, a quiz:
Introduction to git and GitHub
When you work on a text document, say your CV using text editors like Google Docs or Microsoft Word, you can undo certain changes using Ctrl + z .
Building a piece of software, can be like working on a text document. Often times, you'd write code, revert some changes and make certain variations to the work done overtime.
Things get more interesting when you work in teams, where a few people or thousands of people work concurrently on the project's codebase. In this case using Ctrl + z is never enough, and often times, you have a working solution you wouldn't want to break, this is the true essence of git and GitHub.
These two tools along with other substitutes and related technologies form the Version control system.
Learning git and GitHub is quite larger than to be crammed into this coursework, for this reason I have included a video from free code camp which is sufficient to get you up and running.
Introduction backend development
This coursework is focused on building "backend" applications. We'll start by to explaining what that means and a very popular analogy is the restaurant analogy.
Imagine a modern restaurant, there's the customer sitting area, the waiter or waitress, and a kitchen. Often, the kitchen would have some kind of back-office or a store where things are kept.
In a similar fashion, an application or a piece of software is composed of three major layers; the presentation layer ( frontend), the business logic layer (backend), and the persistence layer (database).
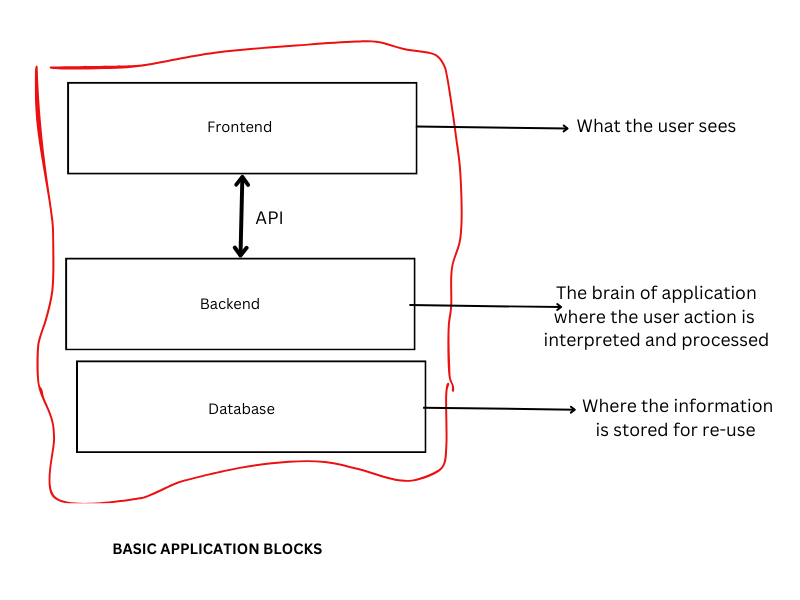
The presentation layer is formally known as the frontend. This can be a mobile application, a web application, a desktop application or even a Command Line application. The purpose of the frontend is to abstract away the wiring of the system and make it cognitive and understandable for end-users.
The backend is where all the heavy lifting happens; where the user's request are understood, validated, and processed. Usually the backend would need to interact with some kind of stored data.
Between the backend and the frontend we have the Application Programming Interfaces (APIs) which serves as the pipeline connecting the application core (backend) to what the users see -- the frontend.
As a backend engineer, your duties would be to build the application core using any programming language you are most convenient with or with the one your team uses or the one your team lead specifies. Part of yor job is also deciding how the frontend would consume the available resources and handling the absence thereof.
With this, we have come to the end of the preliminary concepts. In the next section, we will focus on programming, from choosing a programming language to doing some tasks and petty projects.
Choosing a programming language
If you are reading this chapter first, or you're starting from this chapter without any prior experience in programming, it is important that you have a firm grasp of the preliminary concepts found in modules 1 - 7.
However, if you're already established in the basics, I would like to congratulate you for getting past the preliminary concepts section. You are now ready for the actual work.
In this section, our focus would be on programming! It's been quite interesting exploring the preliminary concepts, and we're finally here. Let's being!
tip
Before you begin programming, note that, some things might take time to stick, and that's not your fault, I'll be using mostly video contents going on to make it easier, there's also a Discord server where you can find me .
What you should know
In a sense, choosing your first programming language can be a bit like choosing your first car. Typically, you want something comfortable and not overpriced. Here are some key things you should know before choosing a language (or your first car 😃 )
- 1. The end goal
- That's the domain you want to programming in, is it building mobile apps, building servers(backend), or working with AI?
- 2. Community strength and support
- When you build applications or software, you'd run into issues and you'd be in need of help, it's great to choose a language adopted for the domain, for instance,using Golang for embedded software might be wrong because you may not get a lot of support, at least as of the time of this writing, when compared to the use and adoption of C/C++
- 3. Learning curve
- While this isn't exactly a problem when you have moderate study time or a good schedule, a steep learning curve mean you need to do more groundwork to understand some concepts
Now, let's try to review those keynotes and how this resource helps you,
- The end goal: The end goal of this book is to teach you core programming concepts and make you a backend engineer.
- Adoption: I have carefully selected one of the most popular programming languages used for building backend applications, and that's Javascript, the choice is mostly influenced by what I use as a backend engineer myself, the ease of learning and community adoption; Note that there are also great alternatives — Go, Java, Python, Rust, PHP, Java, C# to name a few, but they won't be covered in this book, or at least not yet.
- Learning curve: The chosen languages have a very friendly learning curves, thus I project you being up to speed in a few weeks
Learning Curves
When we discussed the classification of programming languages, I mentioned 2 classes; compiled languages and interpreted languages, remember?. Allow me to extend it further to include, statically typed languages and dynamically typed languages.
Statically typed languages
In statically typed languages, the programmer is often required to indicate the type of a variable. This mean you must state if your variable is a number or letters (string), an array or something else, an example of such in this book is the Rust programming language.
Dynamically typed languages
In dynamically typed language like JavaScript, it is relatively easy to get to speed, compared to statically typed languages. However, down the lane the learning becomes hard to quantify and it seems as if learning is standstill.
Broadly, statically typed languages are longer to be established in and master but they make it easier to learn other statically typed languages and the dynamically typed ones rather quickly.
Beginning JavaScript
In the previous module, we talked briefly about the available programming languages for this coursework. In this section, we well delve a bit deeper into each of the languages; their use cases, community adoption, strength and trade-off.
Learning expectation
At the end of this module,
- You should have decided the language to learn.
- You should have installed the programming language toolchain 1
- You should be able to write an "Hello, World" program, in the language of choice.
Prerequisite knowledge
Learning requirement
- Choice of programming language
- VS code or another editor
- Access to the internet
Let's begin!
a programming language toolchain is a set of softwares you install on your laptop to facilitate building software with a specific language.
Introduction to JavaScript
Quick Overview
Here's a quick overview of the JavaScript programming language
| Attribute | Value |
|---|---|
| Logo | |
| File extension | .js, .cjs, mjs |
| Year founded | 1995 |
| Creator | Brendan Eich |
| Official website | https://262.ecma-international.org/ |
| Update frequency | Yearly since 2015 (ES6) |
| Classification | Dynamic language |
| Package repository | https://www.npmjs.com/ |
JavaScript, also called ECMAScript, and not to be confused with another programming language, called Java, was created by Brendan Eich in 1995 to add interactivity to websites.
Back in those days, there weren't beautiful and dynamic websites as seen today, JavaScript was one of the major tools that made this a reality.
However, it has evolved to support various other use cases, including backend development, mobile applications, machine learning, task automation, scripting and many more.
History of JavaScript
JavaScript was created in 1995 by Brendan Eich while he was working at Netscape Communications Corporation. It was originally called Mocha, then LiveScript, before finally being named JavaScript to capitalize on the popularity of Java at the time.
Not until 2009 when NodeJs, (discussed shortly), was released, JavaScript was used predominantly (if not entirely) for building websites along with HTML and CSS.
What is NodeJS?
Every web browsers has JavaScript engine (JavaScript interpreter, JavaScript runtime), which makes it possible to programmatically control or modify the website, through two major interfaces called the Document Object Model and the Browser Object Model. The JavaScript engine is also essentially for effective functioning of JavaScript frameworks (and libraries) like Vue, Angular and React which you have probably heard of.
In 2009, a man called Ryan Dahl, created something that has since broaden the use of JavaScript. Ryan "extracted" the JavaScript engine from a browser and make it use able outside the browser, he called this creation NodeJS
With NodeJs, it is now possible for to use JavaScript for virtually anything.
In 2010, npm1 was created, this made it possible to use other people's code, or code fragments also know as frameworks2, or libraries3 which they give out freely (Open Source Codes), thus increasing the strength of the JavaScript community.
Other important things to note are:
- 2010, ExpressJs A tool for building servers (backend)
- 2012, Typescript another programming language, modelled after JavaScript
- 2013, Electron - A tool for creating desktop applications
- 2015, React Native - A tool for building mobile applications and desktop applications JavaScript
- 2018, Deno Deno is a runtime for JavaScript, TypeScript, and WebAssembly that is based on the V8 JavaScript engine
- Bun Bun is a fast JavaScript runtime
The Bottom line is, JavaScript has been around for almost three decades and, a number of dictators have tried to overthrow it (pun intended). I don't think it would be going anywhere anytime soon, especially with it increasing adoption
NPM stands for Node Package Manager. It's a free, open-source registry and command-line tool for JavaScript software packages
Frameworks are often used as the foundation for building apps for specific platforms, they can be likened to skeleton
A library a collection of pre-written code that programmers can use to create applications, A fitting analogy is a collection of fabrics, buttons, threads e.t.c that seamstresses keep, with the right combination of choice you can make any dress
JavaScript Use cases
JavaScript is actively used in the following fields
- Websites frontends: Frameworks like Vue, React, Angular, Svelte and lots more help you build rich websites in JavaScript
- Task automation and scripting
- Desktop application, Electron is a leading tool for building desktop application with JavaScript
- Mobile applications: Ionic, React native, framework 7
- Servers Tools like Express, NestJs, Hapi, Koa and many more allow one to build servers (backend) with relative ease
- Game development JavaScript game development frameworks include Babylon.js, PixiJS, Three.js, Phaser, and such like. These frameworks can be used to create 2D and 3D games for the web and mobile
Hello World program in JavaScript
In this section, we are going to install the NodeJs and write a basic program that prints "Hello World!"
Installing NodeJS
See the NodeJs setup guide here https://nodejs.org/en/download, for Windows user, you need to add NodeJs to you path variable, see the guide here https://hackmd.io/@hm222vx/AddNodeJSPath
Confirm NodeJs installation
When you install NodeJs, it comes with other tools like npx and npm, to
confirm the installation is successfully, open a new terminal and type in the
following commands, one at a time.
node -v
npm -v
npx -v
What is an "Hello World" program ?
Put simply, it is a program that prints "Hello world" (or "Hello, world!"). It's like some sort of ritual in the broad programming community to welcome a new programmer, some sort of a baby's first cry.
Writing the Hello world program in JavaScript
Step one: Create a new hello_world.js file
touch hello_world.js
Step two: Add the code below to your hello_world.js file
console.log("Hello World!");
Step three in the same terminal used to create the new file, execute the command
node hello_world.js
Summary
In this module;
- We explored and installed the Rust and JavaScript toolchain
- We wrote and execute an hello world program
In the next and subsequent modules, the lessons would be mostly video content as opposed to text-first approach you've see up to this point.
Strap in and happy hacking!
Module review
And now, a quiz:
Contributors
If you find this resource helpful, consider shouting out to us on X (formally twitter)